| Strategy Game Home | Board Game Design | Rules & Resources | Ordering Options | Contact Us |
Board Game DesignThe Making of VIKTORY IINote from Peter Morrison: A friend of mine encouraged me to write this history of VIKTORY II so that players could see the metamorphosis of the game concept over time and also for the benefit of other gamers that were thinking of independently developing a board game. Hopefully, this might help someone else avoid some of the pitfalls along the way. The development of VIKTORY II has undergone a lot of changes in its development. Imperial Conquest Game IdeaThe initial inspiration came in March/April of 2003. There were two main influences: 1. Years of playing Axis & Allies and developing my own house rules for the different variants, particularly a set of combat rules which promoted combined arms, by allowing only one die per unit type engaged in battle, rather than per unit engaged. 2. Recent experiences from playing Settlers of Catan, which was the first game I played on a modular hex board. I lamented the fact that there wasn't any fighting in Settlers and had been wondering how to remedy the problem. My wife and I were watching a movie at home and while she was gone on a pregnancy bathroom break, and the movie was paused, the idea came to me. Needless to say the movie was stopped for the night and a full hour of idea generation flowed freely as ideas were explained to her, and she listened with an interest only an ardent gamer or wife could possess. The next day I composed the following email, writing up my thoughts for the new game. Early play testing soon followed, using spare Settler hexes that I had, along with Axis & Allies pieces. At the time, Conquest was intended as game set in the modern day, using modern tanks, and planes as weaponry. Conquest was a name my Dad initially suggested, which was temporarily changed to Imperial Conquest, and finally changed to VIKTORY for trademark reasons.
Here is a closeup of the troops. Note the crude methods I was forced to resort to in these early days. The fluorescent post-it strips are to indicate different terrain types.
After some initial testing, I decided it would be easier to construct my own hexes, and with a pair of scissors and some construction paper, produced the map below on a Sunday afternoon. Note that the game is still set in the modern era, with oil still being used as a resource and A&A pieces representing the units. However, the hexes were extremely light and floated all over the table and were a real pain to keep together.
However, for the first time, the game was beginning to take full shape with over a hundred little hexes making up the map and 4 players going head to head. It was actually just my wife and I, but we each played a couple of different players. Combat Rules BackgroundA key part of the game's combat was that the number of dice each player would roll wasn't determined by the number of units they had in the battle, but by the number of unit types they had in the battle. If a player had 10 tanks, 10 planes, and 10 infantry engaged, he would only roll 3 dice, 1 for each unit type. The history behind this rule does a lot to explain the history behind my design preferences and personal development as a game designer. Axis & Allies had always been my favorite game, ever since I first played it my sophomore year in high school. Almost immediately I had begun developing house rules, scouring the internet for rules devised by other gamers, and playtesting one proposed rule after another. Through my remaining high school and college years, that rule set of house rules continued to grow. I even spent an entire college semester drawing and creating a custom Axis & Allies world map. Sadly, I only got to play on it once!
The result of my efforts was increased game bloat rather than increased game fun. It really hit home to me when after college graduation a friend visited for a weekend and since we only had a single afternoon to play games, suggested that we just play with the regular Axis & Allies rules rather than our own house rules. When you're faced with the realization that your house rules aren't even worth playing in your own house - it's time to give them up! My mindset immediately changed. Instead of developing rules because they sounded cool or historically accurate (ie more detailed and complicated), I decided to start by deciding what did I want to happen in particular game situations and then figure out what rules would allow that to happen. When I took time to reflect on what was I looking for, it wasn't a WWII reenactment that would take an entire weekend to play, it was a fun, light wargame, that would be quick to play, yet still requiring strategy and tactical skill in execution. I went back to the drawing board and rethought/reworked everything. The number of units used in my revised house rules dropped drastically, the rules were simplified, and when I was finished the game actually took around 3 hours to play, which is less time than a typical Axis & Allies game. The one rule that I was most proud of is the one relevant to this discussion - limiting dice rolls to the number of unit types engaged and not the number of actual units engaged. Two specific things that I didn't like about Axis & Allies was that the best purchasing strategy was to just buy all infantry (and transports to move them), and the best game strategy was to "clump" those units in massive stacks. Infantry were cheap, great on the defensive, and highly effective in large groups. The result in game play was a steady buildup, with minimal large battles, as each side saved up for an Armageddon battle at the end of the game, involving huge stacks of infantry finally battling it out either Eastern Europe or Karelia. It was like two heavyweights slowly moving around the ring, each trying to throw a one punch knockout blow. My preferences were for a battle of lightweights throwing a continuous variety of different types of jabs and punches (combined arms) that would be electrifying to play. Realizing what it was that I didn't like was easy, so too was figuring out what I did like (a game with combined arms and continuous fighting) - the problem was trying to develop a rule or set of rules that would get me there. I felt that it's always better to use the carrot rather than the stick to encourage players to make certain game decisions (such as buying a variety of units) rather than penalize them for making game decisions that you don't want them to make (such as buying all infantry or clumping their units). But how to keep a player from taking two stacks of 5 infantry and making it one stack of 10 infantry so that they could defend more strongly together? While it's currently fashionable to degrade the game RISK, it would offer the inspiration I was looking for. In RISK, players max out the number of dice they can roll at 3 dice. After you have the minimum of two units to make an attack, you get an extra die for each additional attacking unit you have, up to a limit of four units. After you have four attacking units, you can have as many additional units as you like in the battle, but it won't add to your dice rolls. My wife and I were riding to church one Sunday evening and I was discussing how RISK offered such a simple solution to the clumping problem - no further benefit to additional army size after a certain maximum size has been reached. You can tell how much she loves me from listening to such an exciting topic get expounded :) However, I wanted an additional effect other than just capping the number of dice that could be rolled. I wanted to encourage combined arms in battles. In a moment of inspiration on that car ride, I saw how to achieve both goals. Instead of just arbitrarily capping the maximum number of dice that you could roll, I would tie it to the number of unit types you had engaged in battle. That would simultaneously encourage combined arms and greatly reduce the problem of clumping. That became the core of my combat system in my Axis & Allies house rules, was immediately imported into use in Imperial Conquest, and has remained a constant factor in each phase of VIKTORY II's development.
Imperial Conquest DevelopmentAs Imperial Conquest developed, I quickly realized that the use of individual hexes for the map mean that it could be varying in size, depending on the # of players. The diagram drawn below shows how a small map (the inner blue hexagon) can be used for a 2 player game, and then successively larger maps can be used for additional players, going up to a map size that would support a 5-6 player game.
Now that the game was starting to develop into a serious game, I began thinking about how to produce enough games to possibly sell. During this phase of development, a "factory" was setup for a production run of actual matboard hexes. A paper cutter and color printer were quickly purchased. Along with the step forward in technology and improvement in hex quality, was an increase in hours worked, often at late hours of the night. Imperial Conquest also took its first step forward, or rather backward in time, to that of the Napoleonic era, at the suggestion of a friend of mine. Planes and tanks became artillery and cavalry, while oil solidified and changed colors to become gold. It was difficult trying to develop the graphics to represent the different terrains. I had yet to hire an artist to create custom artwork. I eventually came up with the following:
I experimented with a lot of different materials (lamination, photopaper, regular paper, iron-ons, foamboard, cardstock, cork, flannel, and vinyl) in trying to figure out how to manufacture the hexes. I didn't know what would be best. Because of the difficulty with keeping the little construction paper hexes together, I was concerned about maintaining map integrity during game play and was hoping to find a solution that would create friction between the hexes and the game table. I considered flannel because I remembered the use of flannel boards in Vacation Bible School (VBS) as a kid and I thought if flannel-on-flannel creates enough friction to defy gravity, then putting it on the bottom of the hexes might be a cheap way to keep the map hexes together. The downside was it required a bottom sheet of flannel as a base for the hexes to sit on.
The final process I decided upon was to print out a sheet of the hexes, use a can of spray adhesive to glue the sheets to a section of 1/16th inch matboard, then spray glue a piece of flannel underneath and cut it out on the paper cutter. This method was time consuming, costly, and a general pain to use the paper cutter to cut through so many layers.
Below is the finished product in all its glory. There's a science fair backboard cut up to use as a base foundation, with blue flannel sheets glued to it. The flannel on the backboard and flannel on the back of the hexes created a locking seal to keep the hexes from moving around during game play. I joked that I was using FeltcroTM technology. There are five terrain types: gold, water, food, ore, and desert at this point.
After a weekend of intense game play testing, I decided to use a new terrain, wood, to replace desert. Also, due to cost conscious reasons, a few more expensive options have been removed. The matboard, science fair background board, and more expensive coated card stock paper have now been replaced with cheaper, yet still quality alternatives. The base is a square yard of green flannel, and the hexes are made from Color Rich Plus Ink Jet Paper glued to a sturdy piece of felt (it's the material used to make sports pennants). You get a sturdy hexagonal tile, that is cheap to make and easy to cut out (read "no more paper cutter aches and pains"). Also, the hexes are now 1.75 inches, as opposed to 1.5 inches in the first version (which were judged to be too small to fit the playing pieces). In this picture you can also see my sweet setup for my home office, check out my new computer, flat screen monitor (woo-hoo...15"), comfortable black leather chair, and can barely make out the prerequisite glass of highly caffeinated beverage at my left hand (the right uses the mouse, the left is for my caffeine fuel intake) - in this case it's Dr Pepper Red Fusion that was helping me get through my day! It's a shame you can't get it anymore. The next two pictures show close-ups. Note the use of spare Risk pieces for the infantry/cavalry/artillery units, Marks-a-lot colored wooden towns/cities and ships. Each ship was originally going to be called a "Man O' War", but I felt that led to confusion with plurals, possessive forms and awkward phrasing...Man O' Wars?...Men O'War?...Man O' War's? and so I settled for calling them frigates. So far they were just little flat pieces of wood! You can really see the different terrains here: water, food, wood, ore, and gold.
An even closer, close-up. Wouldn't you hate to be in that gray house across the water that is about to get blasted by the yellow cannon! - it's the one that I missed a side on while I was coloring and you can see the unfinished wood.
The final version, now called Imperial Conquest with all six colors and all included pieces, looked like this. You can read the rules to Imperial Conquest here.
Production of Wooden HexesThere were a few problems with the hexes. The paper glued to the flannel board didn't always stay down in the corners. The hexes were being cut out by a paper cutter - which was acceptable, but didn't always produce hexes that were perfect hexagons due to human error. For a while I tried manufacturing the hexes out of wood. I found a source for 1/16" birch plywood (typically used for making cabinets). It came from a specialty wood store in a 5'x5' sheet from Europe. Then I developed a reliable method for cutting hexes out of the plywood. The plywood was ripped into 1.75" strips, then the strips were bunched together and diagonal cuts using a pair of dueling table saws cut out the hexes. Two saws were needed because they had to be setup at opposing angles to make the cuts sequentially and avoid having to change the saw blade angle between each group of hexes that were cut off in a batch. To paint the wooden hexes, I used Rust-Oleum Hammered Enamel spray paint, which my Dad suggested. This is some sweet spray paint. It creates a 3D "hammered" texture as it is applied. I used Blue, Gold, Green, and Silver for the water, gold, food, and ore terrains, along with a spray-on wood stain for the wood terrain.
The final result was a great wooden hex tile, but it was far too difficult to manufacture on large scale.
Production of Wooden Town/City IconsI also was tried manufacturing the town/city icons out of wood. During the summer of 2003, I bought a $100 starter table saw from Lowe's and got some hands on experience making little wooden game components. I was working out of my garage and got asked by my neighbor, who could see the sawdust flying furiously, if I was making molding or cabinets. After I told him I was making board game components for my own board game, he just got this funny look on his face and said, "Oh, that's interesting..." The saw blade had to be one with lots of small teeth, so that it wouldn't make rough, splintery cuts on the wood. The wood I used to make the town/city icons was 3'x6"x1/2" planks of hobby wood from Lowe's. It's a high grade pine wood that doesn't have any knots in it. The 1/2"x1/2"x1/2" town/city icons were designed so that they could sit on top of each other. A single icon was a town. Stacking one icon on top of another so that they nested together represented a city.
I initially considered producing them from off the shelf corner molding, but unfortunately nothing I could find was the right thickness and so I'd have to produce them all myself. Step One in producing the town/city icons was to rip the 3'x6"x1/2" planks of hobby wood into strips like this with an angled blade set to exactly the right depth:
Step Two was much more difficult and involved taping together (to keep them tightly bunched) a stack of the strips and using the table saw with a vertical blade setting to chop off a row of little town/city icons with each pass along the blade. One problem I faced was that because the wooden icons were so small, as they got cut by the saw blade, they would fall into the open space between the saw blade and the table of the table saw. As soon as they hit the saw blade, they would richochet at high speed around my garage and I'd be literally dodging wooden bullets. To cover this void between the saw blade and the table, I took a piece of cardboard and lowered it on top of the rotating saw blade, letting the blade cut through and the cardboard come to rest on top of the table saw. Then I duct-tapped the cardboard to the top of the table saw - a Redneck solution if there ever was one! I graduated from Texas A&M University though, so maybe it was just some good Aggie engineering! The sheet of cardboard, in effect, became the table of the saw, and covered the hole around the blade. Now the little wooden pieces would be supported as they got cut off. The next problem was that I still had to get the pieces away from the saw blade. Even though my cardboard solution kept the wooden pieces from falling in the hole beside the blade, it just left them up on the table near the blade and with the constant vibration of the table saw, they would often vibrate right into the blade, leaving me running for cover as ricocheting pieces of wood pinged the walls and ceiling of my garage! Usually when you cut a piece of wood, it's long enough that you can grab the cut off piece of wood on the far side of the blade and pull it away from the blade. Since these were virtually 1/2" cubes, I'd have to get my fingers within 1/2" of the whirring saw blade to pull it clear - not the safest proposition - Kids, don't try this at home. My Dad, the master craftsman, came through for me again. His solution was to take a bigger piece of wood, in this case a 1"x2" stick, lay it on the table saw such that the 2" is the vertical height, and use that to push the taped together bundle of sticks past the blade. The saw blade was set at about 3/4" in height, and so it wouldn't cut all the way through the 1"x2" stick, though it would cut all the way through the 1/2" sticks I was chopping up into little towns/cities. This was an ideal solution and with practice I could keep nearly a continuous flow of little houses dropping into my production box. Working quickly, I calculated it took me about 1 second per icon to create the wooden strip, then another 1 second per icon to chop it off the strip for a total of 2 seconds of labor to create a single town/city icon. Painting the Town/City IconsUnfortunately, that didn't even take into account the pain of painting the icons. I tried spray painting them, but it was a touch and go operation. If you got too close, the blast of spray paint would actually knock over the hexes. Too thick and the paint would get globby; too thin and the raw wood would show through. Even worse was the laborious process of having to turn the icons around to get all four sides, plus the top and bottom! My last effort was to put a bunch of them in a bag made of tulle (a gauzy
material) and dip them in a bucket of watered down paint. The paint was
watered down so that it wouldn't form globs on the town/city icons. This worked well enough, although it was more of a dye-job than a good painting, since the paint was so thin. The tulle naturally got stained as well. Here's what a white piece of tulle looked like after it had been dipped in watered-down red paint. I decided this was too painstaking, and while I might revisit it one day for a limited edition release, I decided to go with easier, cheaper plastic alternatives. Handcrafted pieces were just a bit too difficult! The encouraging thing was that I still had all of my fingers intact after using table saws all summer to cut out such small pieces of wood! Imperial Conquest ResultsAfter all my development efforts thus far, I had sold a whopping four copies of Imperial Conquest. Embarrassingly, I had to refund two of those orders because I couldn't even get the pieces together to ship the game copies. Only two copies actually got shipped, and those were shipped in a plastic tupperware container from Target (I couldn't find a plain, regular game box in any of the hobby stores I explored) with the newer wooden hexes and wooden town/city icons, spare RISK pieces for infantry, artillery and cavalry, and these tear-dropped shaped Hobby Lobby wooden pieces for frigates. Maybe those two copies will be worth something one day for being so extremely rare. At this point, I was in the process of moving and my first child, Luke, was born, which made continued game development difficult and forced me to wait a year (fall of 2003-fall of 2004) before resuming efforts. Rule ConundrumsMeanwhile, I was constantly playtesting the game and further refining it. One problem that had emerged was that the selective hit capability of cavalry and artillery (where they got to pick which enemy unit they hit) wasn't working as intended. Instead of being a nice subtle bonus, its effect dominated battles. Suddenly battles were determined not by the clashing of two armies, but it became who could kill the other's cavalry first. Once your enemy's cavalry unit was taken out, then you could just mop up the infantry (which would roll a collective 1 die back). At that point, the enemy infantry could never get get a hit against your cavalry as long as you had cannon fodder with you. Although I love Axis & Allies, the fact that your tanks would never die as long as they were protected by infantry had always bugged me. In my game, I had hoped to have the different unit types get killed off at about the same rate. I didn't want the elite units to be completely immune from damage and I didn't want them to get decimated first. The problem was too much of a good thing (100% selective hits by cavalry/artillery). The solution was to dial the effect back, ie all hits would still be on a 3 or less, but now any hits on a "1" would be a selective hit. This accomplished two goals, infantry could occasionally kill elite units and elite units wouldn't always kill an enemy elite unit first. Playtesting showed this latest casualty rule to create battles in which all unit types were killed off at a balanced rate. While you still hoped to roll deadly 1's to take out enemy elite units, the variability in battle outcomes had been reduced and the removal of casualties "felt" right. Up until now, the resource model was rather ordinary, towns and cities each produced a resource chip on their turn. Those resource chips would then be used to purchase units and construct towns. They could also be traded with other players who had resource scarcity. This was a concept heavily influenced from the confluence of Axis & Allies production and Settlers of Catan trading aspects. Gaming Inexperience & ReflectionsNote that at this point in my gaming career I had played relatively few games, and was hardly an elite gamer. I thought Puerto Rico was just an island in the Caribbean! I think my inexperience helped in some ways and hurt in others. Without having ever played or seen a Seafarers of Catan map, I didn't even consider making an interlocking puzzle piece perimeter to help hold the map together. Never having played Entdecker, I didn't think about using an exploration phase to explore and discover the random tile map. That said, the lack of experience caused me to brainstorm about new ways to do things, and to truly examine what I hoped to develop and then reverse engineer my own solutions and rules. One problem that was occurring in recent games of Imperial Conquest is that players were turtling, although I confess I didn't know that it was called "turtling" at the time :) I knew it was a problem though, because I wanted the game to have continuous military action. Axis & Allies had solved that problem by having teams. Since there are only two sides in Axis & Allies, a 3rd party can't sit out of the fighting and just grow stronger. However, I wanted my game to be a true multiplayer - where every player would battle it out to the end for their own victory, not a team victory. With my gaming inexperience, I didn't know that most games sidestepped the whole "battle it out to the bloody end" issue by just having a points-based victory or race-to-a-certain-number-of-kills-based victory. The game RISK allowed you to fight it out to the bloody end, which was the goal I was seeking, but RISK found resolution only through the introduction of cards to overcome its mutually assured destruction (MAD) combat. When a player can play a set of matching RISK cards on a single turn and get a 50-100% boost in the size of his army, a lot of wild and crazy action can occur, and the power swings that result will bring the game to a close. Interestingly enough, at the time I overlooked a critical component of the card play in RISK - when a player takes out another player, the victor gains all of the cards held by the defeated player. In other words, card resources are preserved and not destroyed when one player defeats another. Radical New Resource & Production ModelI decided that the problem with Imperial Conquest was that it was better to avoid fighting because resources would get destroyed and other noncombatants would be able to sit out of the fighting and grow stronger. To encourage fighting then, I would have to have conservation of resources, so that armies wouldn't be completely destroyed from fighting. What flipped the switch in my mind on how to do this was my brief knowledge of Diplomacy. I came to the conclusion that instead of purchasing units with resources, they should be supported by existing towns/cities. When a player lost a town/city, he would lose the units supported by that town/city. When a player gained a town/city, he would gain the corresponding units supported by that town/city. You can read about my initial email thoughts on the rule change here. This rule would become the foundation of what I think is unique and special in VIKTORY II's design. There would no longer be a lasting penalty for attacking, as your units would never really be lost. VIKTORY II had become an attacker's paradise. The best part of this rule is that it would achieve my long-standing principle and goal of continuous fighting. The days of turtling were over. When matched with my combined arms combat rules, I now had a set of rules seething with aggression and ready to boil over! This was a HUGE change in how the game would develop. Suddenly there was no real risk to fighting, as any units that were defeated would just have to retreat into an adjacent hex. The rule held up under playtesting. One short-lived problem that emerged though was that simply retreating didn't seem to be enough of a penalty. Retreating units just clogged up the map and made it harder to slog through your opponent. That gave birth to the idea of removing hit units to a holding place off the board and getting them back at the end of your turn. I initially called the holding place "purgatory", but then my Dad suggested the much more official sounding "Reserve", which continues to be its name. With casualties going through a revolving door and flowing right back into the game, the number of units would maintain a steady state. The game wouldn't have long periods of relative calm followed by brief periods of intense fighting. There wouldn't be any saving or building up for an Armageddon at the end of the game. It would be a battle royale cage match throughout as each player would scramble to get on top and crush his opponents. The game would now have zero sum accounting. If you were getting stronger, someone else was getting weaker. If you were getting weaker, someone else was getting stronger. A novel aspect of this rule was that the type of units in your army would be dependent up on the terrain of your towns/cities. It was structured where a grassland town would support 1 cavalry, a grassland city would support 2 cavalry, a mountain town would support 1 artillery, etc. The problem with this was that it made unit types too dispersed. I wanted combined arms to be a feature of most battles, not constant skirmishing between 2 red cavalry attacking 2 blue artillery (the result of a grassland cities' units attacking a mountain cities' units). Finding the Right "Feel"At this point, some playtester friends of mine said that my game had become too abstract. Infantry could be replaced with rectangles, cavalry with triangles, artillery with circles and the game would still function perfectly well. A friend suggested that all towns support a single infantry and have the elite units (cavalry, artillery, and frigates) be supported when the towns got upgraded to cities. Though reluctant at first to consider the idea, playtesting strongly backed it up. This had the nice benefit of reducing the game's abstraction. Having each town support an infantry "felt" right. Bowen Simmons, developer of Bonaparte at Marengo, talks about achieving "The Look" of 19th century warfare. While I'm not exactly a touchy-feely type, there is something to the fact that I was going for a certain "Feel" to the game. I didn't want the game to become so detailed and historical as to have squares of infantry or lines of men marching across a field, but I also didn't want to create a soulless abstraction, devoid of feeling and theme. I wanted a game with continuous military action that would still feel like military action, and not sterile rectangles, triangles and circles killing other sterile rectangles, triangles and circles. Unit Proportions & BalanceOne of the side effects of having all towns support an infantry was that it injected more infantry into the game. On average there would be about two infantry for every one elite land unit (cavalry & artillery). This balance felt right and it created more combined arms battles, which was a key goal. With infantry:elite units now at an approximate 2:1 ratio in most battles, the rule of achieving selective hits on rolling 1's became ideal. Hits were on a 3 or less, meaning that 1/3 of hits would be selective. Now, the game's ratio of units was such that 1/3 of units would be elite. It worked out perfectly in achieving the balance I sought. On average, casualties would be inflicted in perfect proportion to the number of each unit type in a battle. Players would have twice as many infantry as elite units, and lose twice as many infantry as elite units on a continuous scale. It sounds mundane, but I was excited when I realized this is how it would work out as it had been a long-standing goal of mine. Now that the towns had received added character by only supporting infantry, the next problem to be considered was the lack of character by the different unit types. I wanted infantry to have basic characteristics and the other units to have enhanced abilities beyond those of infantry, but so far they weren't all that different. A cavalry unit got to move 3 hexes instead of just two - that was the only difference. The primary reason you wanted to have cavalry was so that you could roll a single extra die in battle. After thoughtful consideration, I decided that I wanted the cavalry to mainly be an offensive weapon and a desired component in every attack, but not as critical on defense. To accomplish this, I gave cavalry two dice on the attack and kept them at one die on defense. Artillery currently only had the bombardment capability, which was nice, but suddenly overshadowed by the increased attacking power of cavalry. I wanted artillery and cavalry to be balanced and so needed to give artillery additional powers. I temporarily considered raising their attack roll to two dice, but I wanted them to be different from cavalry, yet equally good. The solution I devised was to roll in (small dice pun) their preexisting bombardment ability on top of their normal attack and allow them to do both in a regular attack. Now artillery would get a pre-battle fire of 1 die per artillery when coming in for a regular attack. Being able to roll 1 die per artillery unit, instead of just 1 die for having artillery was a huge bonus. Now, bringing in two or three artillery together in the same battle could have a murderous effect. Plus, the pre-battle fire was indefensible - it occurred before the battle technically began and so casualties wouldn't get a chance to fire back. This nicely balanced the special ability of artillery relative to cavalry. These changes to the unit abilities gave even more character to the game. Artillery shattering enemy lines before they can fire back; cavalry wreaking havoc on the attack - these were elements I wanted in the game. The unit abilities instantly "felt" right. Building Towns & CitiesIn Imperial Conquest, towns were built by an infantry. A player would move an infantry to the located where he wanted to build a town and then remove the player and replace it with a town icon - sort of like a settler unit in Civilization. Towns/cities produced a variety of resource chips (food, wood, ore, gold) depending on their terrain, and then one of each resource chip could be used to upgrade a town into a city. The next major change accompanied the new resource model where units were permanently supported by towns/cities. Now infantry would still move out to found towns, but instead of converting the infantry into the town, it would cost 1 food resource for a town. Cities would cost 6 food resources. Food was the only resource still being produced. From there it was an easy transition to eliminating the last remaining resource - food. The rule that made this possible was a simple one. Each turn you could build a single town or upgrade a town to a city. That was easy and straightforward - like most good rules should be! This greatly simplified the early stages of the game. In the past the early game strategy had been to postpone fighting as long as possible and generate exponential growth of new towns/cities as every available resource would get reinvested into building more towns/cities, instead of going into military units. There had to be economic growth, but that wasn't one of my primary objectives. As I stated in an email on November 27, 2003, I wanted "available economic growth that is not a dominant strategy". I didn't want a rabbit breeding competition, I wanted a fighting game! The game's economics were there to support military units, for action and fighting. Up until now the tail had been wagging the dog. At the same time, it's fun to build an empire and an army. I like being able to start off in a new world and build an empire from the ground up and create an army to defend your empire and conquer others. Founding a CapitalImperial Conquest never had capitals. All towns/cities were of equal importance. This had an elegant symmetry that greatly appealed to me initially. It did have one unpleasant side effect though in actual game play - players weren't locked into their initial starting position. Because of the momentum and mass a victorious army can develop in the game, what would often happen is that Player A would be successfully fighting Player B on his left flank. Meanwhile Player C (on Player A's right flank) would begin to attack Player A. It was often more profitable for Player A to keep attacking Player B, than to try to relocate his army onto his right flank and defend against Player C. Meanwhile Player B, might be facing a similar situation and focus his attacks against Player C. The end result is that without being tied to a particular homeland on the map, the player empires would just rotate. A would consume B, B would consume C, and C would consume A in a circular fashion. A playtester suggested that each side should have a capital town/city that would be their base, and dire consequences would follow losing it. The result was that players would be tied to their starting location and it would become their homeland. Their empires would grow from that point, but they would never abandon that starting town/city, which would serve as their capital. This offered two major improvements. First, it stopped the pointless fighting in a circle which had been happening. Now if your right flank was getting attacked, you'd better do something about it before the enemy broke through to your capital! Second, it was the right feel! "A human life, I think, should be well rooted in some area of native land where it may get the love of tender kinship from the earth..." It felt right to give players homelands to defend, and capitals were the perfect method of providing that feel. Having a potential vulnerability or Achilles heel creates an element of tension in the game, where even if you have a powerful empire, you still have to worry about protecting your capital city. At first the dire consequences of losing your capital were that you couldn't reinforce any of your units from your reserve and so unless you immediately retook your capital with the units you still had out on the board, you'd rapidly wither and die. Later on those consequences were slightly modified such that you could still reinforce with 1 infantry in each town/city, but nothing else, meaning that cavalry, artillery, and frigates would just languish in reserve until you could retake your capital, or their supporting cities fell to another player. Losing your capital wasn't a certain death blow, but it would henceforth be avoided at all costs! Beginning of VIKTORYSoon after, the name officially changed to VIKTORY, as I renewed my efforts to find a time and cost effective way to produce the game. I decided not to worry about the flannel backed hexes any longer and to make the hexes using standard matboard. To cut out the pieces I purchased an Ellison Prestige Pro die cutter and a couple of hexagon making dies. I also found an artist to do some custom artwork for the terrain hexes, which I thought turned out very nicely, in spite of the difficulties in conveying exactly how steep and jagged you want the mountains on your mountain picture to appear.
While the water hex would seem to be the easiest to paint, it actually required the most effort. You can see the various water hexes that have been used along the way:
The artwork for the box cover was started:
but was never finished. I ended up going with a basic design for the first production run of VIKTORY:
The new production process involved gluing the color printed sheets to a sturdy mattboard using 3M Super 77 spray adhesive. Then the glued sheets could be cut out using the Ellison machine.
The production center was basic, yet effective.
and allowed the first production run of VIKTORY to take place. Since I hadn't been able to develop a cost effective means of producing the town/city icons from wood, I decided to buy off the shelf plastic Monopoly style houses and hotels. I was still using spare RISK pieces for the infantry, cavalry, and artillery. You can order these direct from Hasbro, but they limit you to an order of only five sets of pieces per color, so I kept having to make repeat orders to get enough pieces to fill my own orders. This was a workable short term solution though, as the RISK pieces are of a high quality and look nice. The gaping hole in this plan were the ships. I wanted to have
nice-looking ships, but there were no off-the-shelf solutions to be found.
RISK didn't have any plastic ships and I couldn't find plastic colored ships
anywhere in the right size, quantity, and for a reasonable price. For Imperial Conquest I had gotten some thin tear-dropped shaped wooden pieces from Hobby Lobby, painted them and called them frigates. I was determined with VIKTORY to have something better. Sadly all I
could find were these sailboats. Frigates have sails...these boats have
sails...close enough I guess :) Another minor point was getting the right game bags to store all the playing pieces. I initially hadn't given much thought to getting the plastic bags to put the pieces in and just used little Ziplock sandwich bags from a grocery store. That didn't look right though, and in doing some research I discovered Uline.com - an excellent online resource for bags, boxes, packaging tape, etc. They have excellent service, great prices, and once you buy from them once, they'll send you free catalog updates for years! VIKTORY LaunchThe website, www.viktorygame.com was developed, along with several demonstration videos explaining rule concepts, and VIKTORY was ready to be sold on April 8, 2005:
This was when things really got interesting. Up until now, I had basically been in my inventor's workshop with my game, tinkering on it and getting it just so. Now it would have to go out into the real world and meet people - hopefully paying customers :) Early LessonsIt's almost comical to think back over all the silly mistakes that I made in those early days and the lessons that I've learned from experience. My website alone has undergone tons of changes as I'm constantly trying to improve it. One of the most important lessons I've learned is that there are a wide range of gaming preferences out there. You can think that you've developed a good game, and yet, even if it is a great game, it isn't going to appeal to everyone. Some people like monster wargames, some like Eurogames, some like family games, and there is every possible combination of preferences in between. The result is that you're going to face criticism, and making a game is like making a movie - everybody's a critic! The key is not to take it personally. When you're first starting out, it can be difficult to take criticism, and yet criticism can have a beneficial effect as it can point out weaknesses and allow you to improve and mature, both personally and in a game's development. One of the things I've tried to do is to accept the criticism and learn from it. While you certainly can't please everyone and would go crazy trying to, it is possible to identify in the criticism recurring themes and patterns, which can be useful feedback in understanding mistakes or oversights that you've made in either game design or game launch. Often those mistakes can be corrected on the fly, while others you have to just learn to live with. I think it's important to set your course and understand what you're trying to accomplish with your game and what sort of game you want to have. As I've said before, you can't please everyone and will be unable to incorporate every suggestion and every adaptation that comes along. Use what suggestions you can, but remain true to your early vision and be proud of your game! For in the end... "It is not the critic who counts: not the man who points out how the strong man stumbles or where the doer of deeds could have done better. The credit belongs to the man who is actually in the arena, whose face is marred by dust and sweat and blood, who strives valiantly, who errs and comes up short again and again, because there is no effort without error or shortcoming, but who knows the great enthusiasms, the great devotions, who spends himself for a worthy cause; who, at the best, knows, in the end, the triumph of high achievement, and who, at the worst, if he fails, at least he fails while daring greatly, so that his place shall never be with those cold and timid souls who knew neither Viktory nor defeat." VIKTORY ResultsAfter providing me with three month's worth of "What's it like to launch a board game?" on-the-job training, I sold and shipped my last copy on July 14th, 2005 after selling 49 copies of VIKTORY. To put that achievement into perspective, I shipped over 24 times as many copies of VIKTORY as I shipped of Imperial Conquest! At that kind of growth, in another couple of games, I'll be the size of Hasbro :) Beginning of VIKTORY IIThe groundwork for VIKTORY II was laid almost immediately after VIKTORY was released, because to produce a sufficient volume of games with lower production costs, I needed to get custom playing pieces (I was currently just buying off the shelf components that were more expensive). I spent a lot of time trying to find a good injection molding company that could do the work. Below is a sample picture I sent out to prospective molding companies to demonstrate the approximate size and nature of the pieces I needed produced.
After finding the right company to do the work, it took a number of iterations of going back and forth to finally get the initial sketches to look exactly like I wanted them to. Sketches & More SketchesFirst I provided the artist on June 2, 2005 with a lengthy description of all the details I wanted on the pieces. The initial sketches were excellent first attempts, but there were still changes to be made. That led to a 2nd draft. and a 3rd and 4th draft. before finally getting the final sketches on June 22, 2005.
After the sketches were complete, the final drawings seemed perfect and it appeared I would have the pieces very quickly. They were sent to the sculptor who would use the sketches to make the 3D wax sculptures necessary before making the injection molding dies. Sculptures & More SculpturesThe first sculptures on July 11th appeared very different from the final sketches, which was quite frustrating after all the revisions which had occurred with the initial artist perfecting the sketches. Thankfully, the company I was working with was eager to please and willing to work with me to get exactly what I wanted, which led to a second round of sculptures on July 27th, and a third round of sculptures on August 16th, and a fourth round of sculptures on August 22nd, and a fifth round of sculptures on September 9th. More months passed and by going back and forth with the sculptor, the finished sculptures began to emerge, which looked better and better with each revision. At last the sculptures were approved on September 23, 2005 and it was time to begin making the die molds. An Abundance of PiecesIn making the molds, there was a tradeoff between having a more expensive larger mold which can produce more individual pieces each time it is injected with plastic, and a less expensive smaller mold which produces fewer units. This was a decision that would be quite critical, because the size of the mold would determine the number of pieces that would get produced at a time, which would directly correspond to the number of pieces in each color that would get included with the game. I spent a good bit of time thinking about this one. I knew I would
offer a six player version of the game, which would get played on a 169 hex map.
If the land on the map is perfectly optimized, you could theoretically have 37
cities on a six player map. I decided to give each player 32 city
icons in each color, which is about what you would need if everyone was
typically optimizing their build location (only 2 hexes apart) and you fought it
out nearly to the end. In retrospect, perhaps I was including too many pieces, but I like minis and knew future VIKTORY II players would too! You can never have enough of a good thing! So I ended up with a mold that had cavities in a 12/4/4/4 ratio, such that each time the mold was filled, it produced 12 infantry, 4 artillery, 4 cavalry, and 4 frigates. What was nice about the 12/4/4/4 ratio is that 2 molds worth of units/color comprised the number of pieces which went into a the smaller 4 player game set, or a total of 24 infantry, 8 artillery, 8 cavalry, and 8 frigates per color. The 6 player game set would require 3 molds worth of units/color, or a total of 36 infantry, 12 artillery, 12 cavalry, and 12 frigates per color. Plastic Pieces of My OwnThen when I was sent pictures of the initial plastic pieces on November 4th, that had been run through the die, I was again surprised at the difference between them and the wax sculptures which had been approved.
After final approval, samples were produced and sent to me, arriving on December 1st.
As you can see, Blue dominated, then Green and Red were fairly close together, then Yellow and Black were fairly close together, followed much further down by Purple. I was surprised that Purple was in the top six, but I decided to go with the results of the survey, meaning that Blue, Green, Red, Yellow, Black and Purple would be the colors in the six player game version. Another long wait was required before the pieces were produced and then shipped to me. They arrived on March 14, 2006 and provided me a lesson on what can happen while boxes are on an 18-wheeler. Thankfully, the damage to these boxes was all superficial and the pieces inside weren't damaged at all.  Player FeedbackMeanwhile, I had plenty of other work to keep me occupied. Gamers who had
purchased VIKTORY were giving me feedback on their experiences and what they
liked and disliked about the game. Much of that feedback has contributed to the
development of the new VIKTORY II rules and design.
Also, the art for the water hexes was redesigned. The old artwork looked great
individually, with lines of whitecapped waves crossing the hex. The problem were
those lines looked bizarre and psychedelic when laid together to form part of
the map, which led to a more subtle water hex design: Terrain also now plays a much bigger role, particularly forest and mountain hexes. Initially, I was hesitant to add terrain modifiers because I felt it would slow the game down and add needless complexity to it. However, I think it is important to listen to your audience and I was getting a lot of feedback that players were surprised that terrain modifiers weren't included. I started play testing different possibilities and eventually came up with a simple straightforward set of restrictions on movement and changes in the defensive strength of different terrains. To balance the terrain movement restrictions, another couple of rules were added, allowing players to rapidly move units between their cities and across terrain that had been occupied by one of their units for a full turn. The new rules definitely enhanced the character and theme of the game, and the changes allow the game's development to more naturally reflect the strategic variation in each random game map. Another major rule change was the use of an exploration phase at the beginning of the game in which the hexes are gradually revealed as towns/cities are built and players send out units to explore. This greatly simplified the game starting process and slowed down the building frenzy which typically occurred early in the game. A player's turn order also became less important. The probing explorations out into the unknown portions of the map add both more depth and theme to the game, as well as exciting twists and turns which unfold as land bridges are discovered or new bodies of water are revealed. Game plans have to be developed over time as the map gradually gets revealed, and the way the map unfolds will completely alter how the game is played. Eliminating Player EliminationWhen I launched VIKTORY in 2005, I didn't even know that "player elimination" was a phrase of scorn for most gamers. This took me completely by surprise, and was perhaps my greatest shock as I learned of the incredible breadth of different gaming preferences. I thought player elimination was a fancy way of saying in my Southern vernacular, "You jest got whupped!" Apparently though, that is a big no-no in game design, and VIKTORY reeked of it. I'll blame ignorance. For the longest time, I thought my goal of a multi-player, battle-it-out-to-the-end game would be mutually incompatible with an additional goal of avoiding player elimination. If you're going to fight it out to the end, and you start out with multiple players, it almost seems that by default some of the players are going to get pushed out of the way on the path to victory. At last a solution came to me - an alternate rule variant that avoids player elimination. Players still get to battle it out, but instead of completely eliminating opponents, now there is the option to subjugate them and turn them into your vassal. The idea was inspired from a 5 player VIKTORY game I played in January 2006 that had one new player seated to my left. We started fighting early on and I was in a superior position but didn't want to take him out of the game so quickly since the game had just started and he was a new player. Instead we made a nonaggression alliance. Throughout most of the game, he had the weaker position in the alliance and joked that he was my vassal. We ended up taking out all of the other players and when we finally started fighting each other, he gained the upper hand and won the game. A week later, I was on my way to Disney World for vacation with my family and in-laws in a full size van that we rented so that we could all ride together. I kept mulling over in my mind that recent game I had played, because it had planted an idea in my mind that I could still have an aggressive game fought out to the end, and yet avoid player elimination. I knew I could avoid player elimination if I created easier victory conditions or game objectives, but I wanted it to be possible to fight it out to the end, with one player completing dominating. But how to actually make it work? What came to mind was a Whac-A-Mole arcade game. In it, players try to knock all the moles back into their holes for points. However, the moles can still come back up, they aren't destroyed, just knocked down. I hoped to devise rules that would allow players to whack each other down, but not destroy them, still allow them the opportunity to come back up, but would produce a winner if a player could knock down all of the other players at the same time. If so, player elimination would be eliminated.
I decided the best way to work it would be to allow players to take normal towns/cities from each other as usual, but that capitals would never change hands. When a capital fell, the losing player would become the vassal of the victorious player. You'd win by making all other players your vassal. I knew there had to be a way for vassals to get free, and initially thought that could happen if their ruler ever lost his own capital. However, that wouldn't create much incentive for a vassal player to do anything other than just sit around and hope something happens on their behalf. I wanted vassal players to take action and be able to keep fighting and potentially win their freedom through force of arms! Eventually I thought of vassals being able to take other player's capitals, making that player their own vassal and allowing that action to free themselves. Throughout my vacation, I pondered the rule nuances that would be required and occasionally regaled family members with the possibilities this opened up in the game. My initial thoughts outlining how it would work were quickly written down, and then those ideas would get further refined during playtesting. It was more involved than I thought it would be to try to completely outline all of the possible scenarios that could develop under this new system which would be called the Subjugation variant. More so than for any other rule, I spent numerous nights playtesting six player games by myself late into the night, trying to push the limits of the Subjugation variant and making sure I had all possible exceptions and situations covered. Improved Hex Production MethodsProducing the new game became more sophisticated as well. To produce hexes more efficiently (less waste, quicker work flow, larger die = more hexes per cut), I bought an Accucut GrandeMARK die cutting machine in the fall of 2005 (which coincided with Hurricane Rita, delaying delivery).
The Giant custom die that I had developed for the Accucut machine could cut out 45 hexes at a time. This maxed out the number of 2" hexes that could be cut from an 11x17" printed sheet, but was also near perfect in its multiples. Three sheets of 45 hexes = 135 hexes. The smaller four player game map requires 127 hexes, which allows 8 leftover hexes of different terrain types that can be used to create a wider variety of possible maps. Four sheets of 45 hexes = 180 hexes. The larger six player game map requires 169 hexes, which allows 11 leftover hexes to use for creating maps with different terrain concentration. The ratios seemed ideal.
Color Print ChallengesNext, I had to configure the color printed sheet with the different terrain patterns in the right locations. I was at first worried that it wasn't going to work and that my design tolerances were too tight. I was trying to cut out forty-five 2" hexes from an 11x17" sheet of paper. My tolerances (the extra printed area around the hexes to be cut out) were .1125" on average, less than 1/8" of wiggle room up and down. It took a lot of trial and error to get the graphics perfectly aligned on the print sheet, so that when it got cut on the die, the punched out hexes would match up perfectly with the rectangular terrain graphics and I wouldn't get a mountain hex that had a corner which was partially grassland. I quickly learned 1mm = 11.8 pixels, so that I could move the graphics around with exactitude.
Then while trying to print out a sample page that I could cut out using the die cutter and check out my alignment, I found out that converting graphic files to .pdfs to print them can actually shrink them. When I was dealing at the pixel level to align the graphics, I couldn't afford to have a reduced size sample file, because being off just a couple of millimeters would put the printed page out of spec. Ultimately I outputed the raw Photoshop .psd file into an uncompressed .tif file, and was able to print that to get my sample pages. Through trial-and-error I finally got the graphics in the right locations on the printed page and could place an order with Nationwide Color (the best online printer I could find). It appeared I was ready to start production of hexes. First though I needed to figure out how to glue the printed sheets to the matboard. Gluing MethodsPreviously I had used the 3M Super 77 spray adhesive, which I can't recommend highly enough for jobs where you need a spray adhesive. It works great. The biggest two problems with it are that it isn't the safest adhesive to use if you're constantly breathing in the fumes, and that it's fairly expensive. With the thickness of the coat I was applying (I was spraying both the printed sheet and the matboard) it was costing about $1/every 14 square feet, or $1/game. That's $1/game in just glue! When I had started out, I hadn't even considered the cost of glue, assuming it was just incidental. With the escalation in production I planned, I needed to find a safer, cheaper alternative. My dad suggested rolling the glue on. In my inexperience, that sounded somewhat unusual, but apparently that is done all the time. After much experimentation, I hit upon using a 4 or 6" Speedball soft rubber brayer to apply the glue.
The glue that worked the best was Sure-Mount All Purpose Mounting Adhesive from United Mfrs. Supplies, Inc. It wasn't too expensive, and rolled on to a nice coat and was particularly designed for mounting artwork and being applied with a roller.
However, just as I figured out my best practice for applying the glue with a soft rubber brayer, I discovered the Daige Rollataq motorized desktop adhesive system. This is a device designed to automatically apply adhesive to the back of photos or posters. After seeing how it worked, I decided it was perfect. It would save so much time in applying the glue that it was well worth the cost. Using the brand name glue they provide, it costs only $.05/sq. foot, but using the cheaper Sure-Mount alternative I had already discovered (which runs fine in the machine), it costs only $.03/sq. foot compared to an approximate $.07/sq. foot with the 3M Super 77 spray adhesive. This also doesn't take into account the time savings of using a process that applies the glue quicker, or that the liquid glue is much cleaner and safer to use.
While working on the production process, I was also continuously playtesting the game and working on the rules. I should almost have the rules memorized as much time as I've spent pouring over them (10+ hrs just proofreading them with minor edits), agonizing over the exact phrasing in each sentence, and yet knowing that there are still plenty of unclarified loopholes that weren't closed and will soon be discovered! Game TimelineIn one of those playtesting games, I played a 4 player game solo kept exact count of how long it took to play each round, the # of rounds, and the player strength at the end of each round, allowing me to create the strength chart below. Often a game will go back and forth a few times as different players temporarily gain ascendancy, but not in this one, as the green player just dominated until the end. Note this is a game played with the alternate Subjugation variant, in which players don't get eliminated.
Cover ArtI also had to shoot new pictures for the website and cover art. Because I needed an 8 x 10" picture at 300 dpi resolution for the box cover, it was relatively difficult to get the right angled shot, have enough light in the picture, avoid glare, and have a camera that could handle a large enough megapixel image to avoid stitching multiple pictures together.
In April/May of 2006, the artwork for the new VIKTORY II box cover was completely redesigned. I originally started working on it in Macromedia Fireworks, but was forced to move everything into Adobe Photoshop CS2 due to limitations on file size and in order to convert it to CYMK color (which is how it would get printed) as opposed to RGB color. In retrospect I should have worked in Photoshop from the beginning, even though it is so complicated to perform even minor tasks. It's hard to accurately describe the frustration of spending nearly an hour just trying to figure out how to paste a picture inside of a hexagon shape, especially when it only requires 2 seconds to accomplish if you know what you're doing. Thankfully, I survived and more importantly the cover art survived. Game BoxesAt last I could order my new game boxes from Kentucky Paper Box, a professional box manufacturer. Apparently typical game boxes with the telescopic lids are called "rigid setup boxes" in the box making industry, and few box manufacturers go to the trouble of making them. The box top looks like:
The exact size of the box was another important question. I wanted the game box to be big enough to hold both a four player or six player game, and before I settled on the dimensions, I wanted to make sure I knew what I was going to use for the outer shipping box. Since VIKTORY II would primarily be sold over the Internet via www.viktorygame.com (I have yet to line up any offline suppliers), that meant that it would get shipped individually all over the country and world. I wanted to have a good outer shipping box to fit the game within and needed to take that into account in setting my dimensions. After doing a number of calculations, I settled on a VIKTORY II box outer dimensions of 13.5 x 11 x 3". That allowed it to fit nicely inside both a 12.5 x 15.5 x 3" USPS Priority Mail Box and also a 11.875 x 13.625 x 3.375" USPS Priority Mail Flat Rate Box. The VIKTORY II box will fit inside either box, and I have 2 different shipping options to send to customers, depending on how far away they live.
Amazingly, after all the continuous delays in getting my pieces (I originally thought I would get them in September 2005, but didn't until March 14, 2006), the game boxes arrived two weeks ahead of schedule on May 24, 2006 and quickly filled up my garage, and what's shown isn't even all of them!
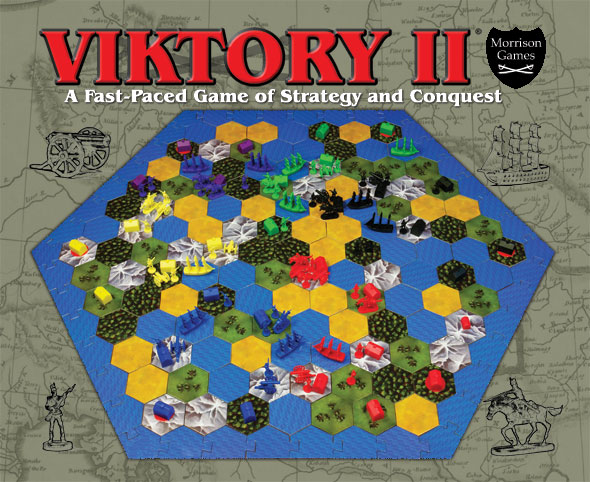
I've ended up having to get a storage unit to put all the extra boxes of game boxes. It's amazing how much space everything takes up, but thousands of boxes are a heck of a lot of boxes, and while they aren't huge, they're still a fairly good size. VIKTORY II LaunchAfter updating the website, reshooting the various demonstration videos, and doing a final assembly, VIKTORY II was ready to be sold on June 5, 2006!
A Daily CommitmentBeing open to take orders was really just another beginning. I spend hours each day answering emails, helping to process orders and get them ready to ship, recruiting affiliates, monitoring advertisements, contacting reviewers, keeping spam off of my forum, making changes to the website, keeping production going for the hexes, handling game assembly, etc. My custom made giant Accucut die finally gave out on me. Thankfully it was covered under a 3 year manufacturer's warranty. I sent in the old die and they manufactured a brand new die and sent it to me within 3 weeks! I was impressed. My originally written rules, which I had been so proud of for being technically correct and air tight (if I say so myself), had a few holes punched in it when players complained that they were difficult to understand. Then I was contacted out of the blue by a fellow game designer, Alan Emrich, who not only completely redesigned my reference cards, but also reorganized all of my rules! One of the best parts of having developed VIKTORY II is that along the way, I've been privileged to encounter a number of thoughtful gamers that I'm now proud to call friends. It's comforting to know such nice people are out there and it's been a joy to have them help me out along this development path. As a business decision, it may be the worst one I've ever made. In the end though, the satisfaction I've gained from having accomplished such a dream is well worth the cost. The Lord has blessed my efforts and I am truly thankful! |